

In this article, I’m going to explain how I changed the splash screens (sleep screen, start screen etc.) on my reMarkable 2 from my Chromebook.


Although there are tools that provide this functionality, all the ones I looked at were designed for the Windows operating system, and as I don’t use Windows, they weren’t of much use to me.
The method can also be used to change the splash screens from any Linux device using a terminal window.
Step 0: What is needed
To change the splash screens, I needed:
- My reMarkable 2
- My Chromebook
- My USB-C cable
The entire process took about 20 minutes.
Warning: Of course, I cannot recommend others following these steps because having direct access to the reMarkable’s file system could potentially screw up the tablet so that it no longer works and void its warranty. Should anyone choose to follow these instructions, they do so at their own risk and I will not be held liable for any damages caused.
Step 1: Set up Linux on the Chromebook
Under the hood, Chromebooks run a version of Linux called ChromeOS, however, access to it via a terminal is not enabled by default.
So, the first step is to set up Linux on the Chromebook by following these instructions from Google.
Step 2: Collecting information from the reMarkable
To connect to the reMarkable filesystem, I needed a few details.
From the reMarkable 2 tablet, I selected MENU and SETTINGS, followed by HELP.
Then, I clicked COPYRIGHTS AND LICENCES.
At the bottom of the page, under the heading GPLv3 Compliance, is the information that I needed to make a note of:
- Username – this will be root
- Password – this will be unique to the device (mine is YWVy3KaILR)
- IP address – this will also be unique to the device (mine is 192.168.13.29)

Step 3: Mounting the reMarkable filesystem
In step 3, I connected to my reMarkable 2 via a Linux terminal over USB-C and mounted a drive in my Chromebook’s filesystem. Although moving/copying files can be carried out from the command line, I felt it was quicker to mount a drive so that I could just drag and drop files.
So, I connected my reMarkable to my Chromebook using the USB-C cable and then opened a Linux terminal window. The terminal app can be found by pressing the SEARCH button and typing terminal.
Next, I installed sshfs from the terminal window by typing the following command:
sudo apt-get install sshfsThis program means that remote filesystems (e.g. the reMarkable 2) can be mounted to a folder on the Chromebook.
I then created a folder on my Chromebook called remarkable, using the command:
mkdir remarkableNext, I mounted the reMarkable’s /usr/share/remarkable folder to the folder I just created with the command:
Note: The /usr/share/remarkable folder on the reMarkable 2 is the location where the splash screens are stored.
sshfs root@192.168.13.29:/usr/share/remarkable remarkableNote: The IP address will vary across devices.
I then typed in the password I had noted in Step 2 to complete the process.
Now, from the file manager app on my Chromebook, I was able to navigate to my reMarkable’s file system. The location was:
My Files -> Linux Files -> remarkable

Step 4: Making custom screens
Looking at the reMarkable folder from my Chromebook I could see a number of PNG files corresponding to the various splash screens. They were:
- suspended.png – the sleep screen
- starting.png – the loading screen
- restart-crashed.png – the restarting screen (following a crash)
- rebooting.png – the restarting screen
- poweroff.png – the power off screen
- overheating.png – the overheating screen
- batteryempty.png – the battery empty screen
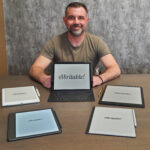
I chose to change the sleep screen, loading screen, restarting screen and power off screen. So I copied each of these files to my chromebook and used some image editing software to remove the reMarkable logo and add my eWritable logo.
I then renamed these files on the reMarkable (just added the word .old to them) and copied my customized files back over to the reMarkable from my Chromebook.
Finally, i went back to the Linux terminal to unmount the file system using the command:
umount remarkableThen I disconnected the USB-C cable and rebooted my reMarkable to check that the splash screens had changed.
Summary
The only downside to this method is that when reMarkable updates the firmware, the screensavers are lost and you have to go through the process again.
This method can also be used to copy custom templates to the reMarkable 2, however, you can’t just upload your PNG template file (it requires the JSON file to be edited as well).
I’ll perhaps write a HOWTO for this in the future if enough people are interested.
About the author
Dan Dutton is passionate about E-ink writing tablets, which bring together the pleasure of writing on paper with the power of digital technology. When he bought his first tablet, he realised that there wasn't a lot of unbiased information available for people that were considering buying an E-ink tablet, and so he built eWritable.